Revamp your space with DIY wall panelling kits or ceiling boards
Transforming a room doesn’t always require a full renovation.
With the simple addition of wall panelling, you can breathe new life into your space without breaking the bank or needing professional expertise.
Wall panelling has long been a staple in interior design, offering a timeless and elegant way to enhance the character of a room.
Whether you’re after a classic, cosy atmosphere or a sleek, modern finish, wall panelling is a versatile solution that works beautifully with various décor styles.
The benefits of DIY wall panelling kits
One of the greatest advantages of wall panelling is how easy it is to install, particularly when using our DIY Wall Panelling Kits.
These kits are designed for homeowners who want to tackle a project themselves without needing advanced skills or complicated tools.
The panels come pre-primed, allowing you to paint them in the colour of your choice, matching your interior perfectly.
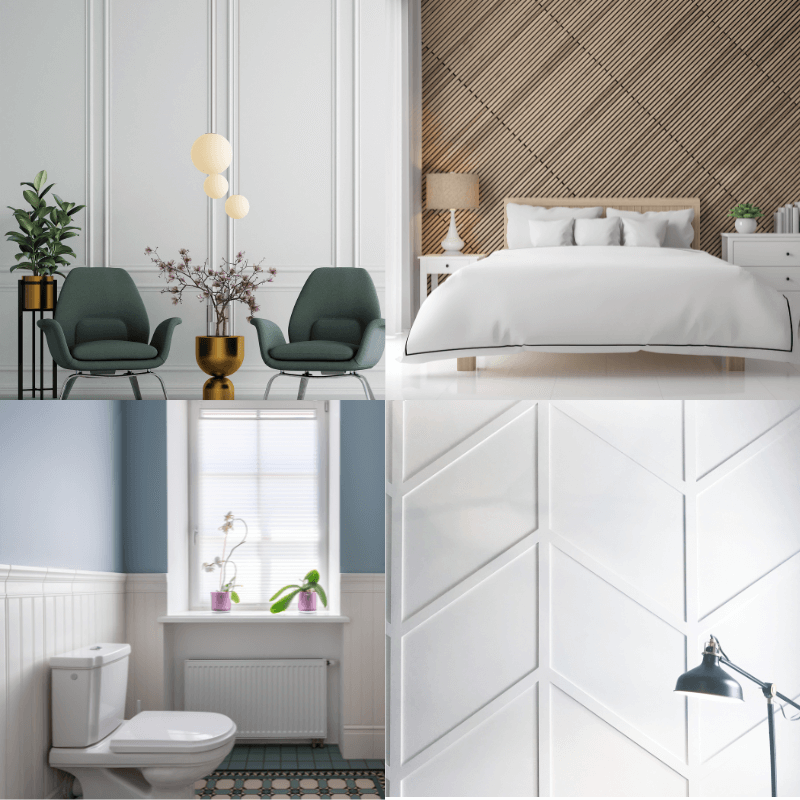
Wall panelling instantly adds texture and depth, turning an otherwise plain wall into a striking focal point.
Not only does it create visual interest, but it also adds a subtle layer of sophistication that makes any room feel more polished and complete.
Step-by-step installation guide for wall panelling
Materials needed:
- DIY Wall Panelling Kit (pre-primed and ready to paint)
- Strong adhesive
- Measuring tape
- Saw for cutting panels (if necessary)
- Small finishing nails (optional)
- Spirit level
- Wood filler
- Sandpaper
- Paint and brushes for finishing
To begin, measure the height you’d like the panels to reach.
A popular option is to cover about halfway up the wall, though panelling the entire wall can also make a striking statement.
Calculate how many kits you’ll need based on your wall’s dimensions, remembering to add an extra 10% to allow for any miscuts or waste.
Once you’ve measured and planned, clean the wall surface, ensuring it’s free from dirt or debris, and mark out where you want the panels to go with a pencil or chalk, using a spirit level to keep everything aligned.
Next, cut the panels if needed to fit around obstacles such as sockets or switches.
Lay the panels out before installing to ensure everything fits as planned.
Apply a generous amount of adhesive to the back of each panel and press it firmly onto the wall.
Adding a few small finishing nails can help secure the panels while the adhesive sets, though this is optional.
Be sure to check the alignment with a spirit level as you go.
Once installed, fill any gaps between the panels with wood filler, smoothing it down for a neat finish. Sand lightly if necessary, then apply your desired paint to complete the look.
Since the panels come primed, you can go straight to painting, saving you time and effort compared to MDF sheets.
Another fantastic option for those looking to elevate their interiors is the use of Ceiling Boards, which can also be creatively repurposed for wall panelling.
These versatile boards provide an elegant finish and can be customised to complement any style, making them a perfect alternative for your DIY project.
Elevate your interiors with Ceiling Boards
Crafted from high-quality planed timber, these boards present a versatile and elegant solution for those looking to transform their living spaces.
The natural warmth of the red deal wood lends a classic appeal that complements various interior styles, from rustic to contemporary.
The beauty of using Ceiling Boards as wall panelling lies in their adaptability.
These boards can be painted, varnished, or stained, allowing you to customise the finish to harmonise perfectly with your existing décor.
This flexibility means you can create a unique atmosphere tailored to your personal taste, whether you prefer a bold statement with vibrant colours or a more subdued look with natural wood stains.
Furthermore, the tongue-and-groove design ensures a seamless installation, creating a polished and sophisticated appearance that can transform any wall into a stunning focal point.
Step-by-step installation guide for Ceiling Boards
Materials Needed:
- Ceiling Boards (planed timber, suitable for painting, varnishing, or staining)
- Measuring tape
- Saw for cutting boards (if necessary)
- Strong adhesive or screws
- Spirit level
- Wood filler
- Sandpaper
- Paint, varnish, or stain for finishing
To embark on your wall panelling project with Ceiling Boards, start by measuring the dimensions of the wall you wish to enhance.
This will help you determine the quantity of boards required.
As with any DIY project, it’s advisable to purchase an extra 10% to account for miscuts or unexpected adjustments.
Once you have your boards, clean the wall surface thoroughly, ensuring it is free from dust and debris.
Use a pencil or chalk to mark reference lines on the wall, establishing where the boards will be installed.
This will serve as a guide, ensuring that your installation is level and aligned correctly.
Next, if necessary, cut the boards to accommodate light switches, sockets, or any other obstacles.
It’s wise to lay the boards out in the desired order before installation to verify that everything fits together as planned.
When you’re ready to install, apply a generous amount of adhesive to the back of each board.
For added stability, you can also opt to screw them into the wall studs.
Begin at one end and carefully work your way across the wall, slotting each board into place using the tongue-and-groove system.
The tongue-and-groove system is a method of joining two pieces of material, typically wood, by fitting a ‘tongue’ from one piece into a corresponding ‘groove’ on the other.
This interlocking design not only allows for a secure connection but also creates a smooth and seamless surface that enhances the overall aesthetic.
It is particularly beneficial in applications such as flooring and panelling, as it provides additional stability and helps prevent gaps from forming over time.
It’s important to continuously check with a spirit level to ensure each board is aligned correctly, preventing any misalignment that could affect the overall look of your project.
Once the boards are securely in place, fill any gaps between them with wood filler, ensuring a seamless finish.
This step is crucial for achieving a professional look.
After the filler has dried, you can lightly sand the area if needed.
Finally, apply your chosen paint, stain, or varnish to complete the transformation.
Opting for DIY wall panelling with these boards means you can take pride in a project completed with your own hands.
This sense of accomplishment can significantly enhance your enjoyment of your space, making it feel truly yours.
Whether you’re a seasoned DIY enthusiast or a novice, using Ceiling Boards provides an engaging project that yields beautiful results.
Get expert advice and plan your project
If you’re uncertain about how much material you’ll need or which products would suit your project best, our knowledgeable team is ready to assist. Give us a call or visit our store in Ballymote, Co. Sligo, for expert advice on planning and executing your DIY project with confidence.
My Build Club
Calling all Trades Professionals, Self Builders, Renovators and DIY lovers!
We have created an entirely unique section of our website that has been designed to make your life easier.
Enjoy discounts, get an even more enhanced level of customer service, find all your paperwork easily and get unique offers and deals regularly.
My Build Club is a brand new innovative service for all Self Builders, Renovators, Trade Professionals and DIY lovers in Ireland.
We have revolutionised how you can source the right products at the very best prices along with putting you in touch with real life experts to help you every step of the way.
Why join today?
- Save money and time when sourcing the supplies you need
- Get Trade discounts just like you would at our Trade Counter
- On demand support from our experts – video calls, live chat and phone support
- All of your paperwork and invoices in the one place
- Arrange fast delivery – including to work sites