
A Step-By-Step Guide to Cleaning Your Chimney
A clean and well-maintained chimney is crucial for the safety and efficiency of your fireplace or wood-burning stove and a rotary chimney cleaning kit is the best tool for this job.
Over time, creosote, soot, and debris can accumulate in your chimney, posing potential fire hazards and reducing the chimney’s ability to draw smoke and gases out of your home.
Regular chimney cleaning is essential, and one effective way to do this is by using a rotary chimney cleaning kit. So lets take a look at the process of cleaning your chimney using this specialised tool.
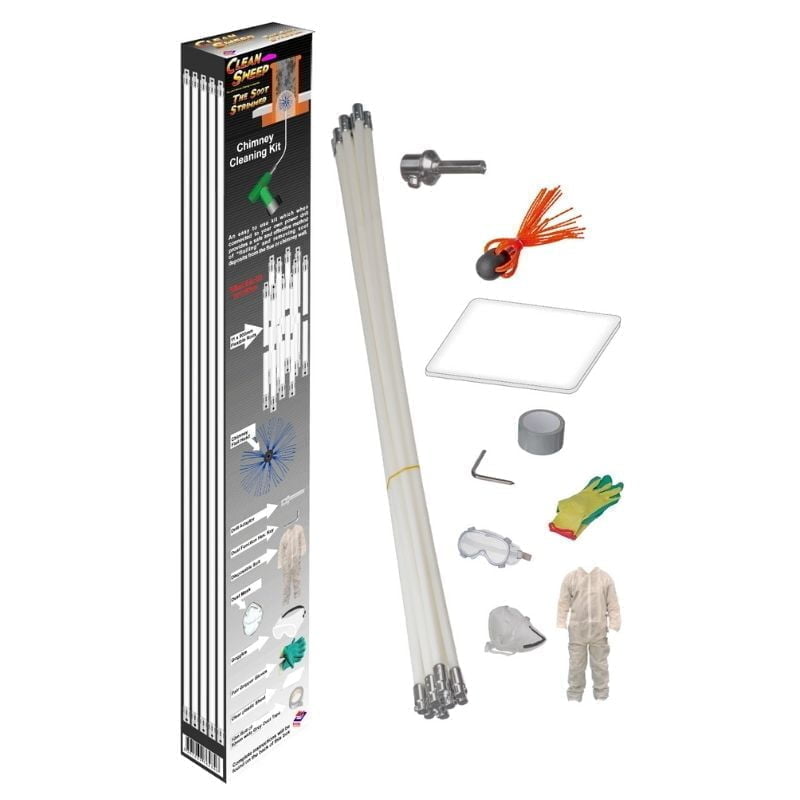
Materials You’ll Need:
- Rotary Chimney Cleaning Kit
- A chimney cleaning brush
- Extension rods
- A drill (cordless or electric)
- Safety goggles
- Dust mask
- Work gloves
- Drop cloths or plastic sheeting
- Chimney sweep brushes (optional)
- Ash vacuum (optional)
Step 1: Safety First
Before you begin, ensure your safety by donning safety goggles, a dust mask, and work gloves. Chimney cleaning can be a dirty job, and you’ll want to protect your eyes, respiratory system, and hands from the soot and debris.
Step 2: Prepare the Work Area
Lay down drop cloths or plastic sheeting around your fireplace or stove to catch any debris that may fall. Make sure to cover furniture and valuable items nearby. This will help you keep the mess contained.
Step 3: Assemble the Rotary Chimney Cleaning Kit
Assemble the rotary chimney cleaning kit. It typically consists of a chimney cleaning brush and extension rods. Attach the brush to the extension rods. The number of rods you need will depend on the height of your chimney.
Step 4: Clean the Flue from Below
Open the damper and insert the brush and extension rods into the fireplace opening. Gradually push the brush up the chimney, making sure to rotate it as you go. The rotating action of the brush helps dislodge creosote and soot. Continue to extend the rods as needed until you’ve reached the top of the chimney.
Step 5: Remove the Brush and Debris
Carefully remove the brush and extension rods from the chimney. Shake off any loose debris and deposit it onto the drop cloth or plastic sheeting. This debris can be highly flammable, so make sure it’s disposed of safely.
Step 6: Inspect the Flue
After cleaning, it’s a good idea to inspect the flue for any remaining debris or obstructions. You can use a flashlight to check for any signs of damage or issues that may require further attention.
Step 7: Clean the Fireplace or Stove
If you have a fireplace or wood-burning stove, don’t forget to clean the interior as well. Use a chimney sweep brush to remove ash and soot buildup. You can also consider using an ash vacuum to make the job easier and cleaner.
Step 8: Dispose of Debris
Properly dispose of the debris and soot in a safe manner. You can bag it and dispose of it according to your local regulations. Never burn this material in your fireplace or stove.
Step 9: Final Cleanup
Remove the drop cloth or plastic sheeting, and dispose of it along with any disposable materials like gloves and masks. Clean your rotary chimney cleaning kit and store it properly for future use.
Regular cleaning is essential for the safety and efficiency of your fireplace or wood-burning stove. A rotary kit makes the task more manageable and effective.
By following the steps outlined in this guide, you can keep your chimney clean and reduce the risk of fire hazards, ensuring that you can enjoy your cosy fireside experience with peace of mind.